Set up DKIM, SPF and DMARC in Google Workspace
The complete guide to set up DKIM, SPF and DMARC in Google Workspace. Check how these protocols impact inbox placement and deliverability.

Set up DKIM, SPF and DMARC in Google Workspace
With spam accounting for 45.3% of worldwide email traffic, email providers including Google Workspace now evaluate multiple protocols to show recipients your message is authentic and actually from you. Having these protocols in place is a clear step to improving your deliverability and making your email less likely to land in the spam folder.
This means you’ll want to set up DKIM, SPF and DMARC by accessing your Google Admin and DNS settings in your domain provider as the first port of call. BIMI on the other hand is a relatively new protocol which you may want to implement after those more established protocols (as BIMI isn’t supported across every email provider yet, the impact of setting it up is not likely to be as considerable as the other methods of authentication yet).
You might already have some of these protocols in place, but, our guide covers the following topics so you can find any flaws in your existing email set-up and ensure each protocol is set up effectively:
- SPF DKIM and DMARC Check
- Why SPF and DKIM are important
- What is DMARC
- Setting up an SPF record (Sender Policy Framework)
- What you need to include in your SPF records
- How to set up a DKIM record (DomainKeys Identified Mail)
- Setting up a DMARC record (Domain Message Authentication Reporting & Conformance)
- Summary check-list and mistakes to avoid
If you’re not a commercial G Suite / Gmail for Business user this guidance might not be as relevant to you, but, don’t worry, we’ll have a separate guide for other email providers soon.
SPF DKIM and DMARC Check
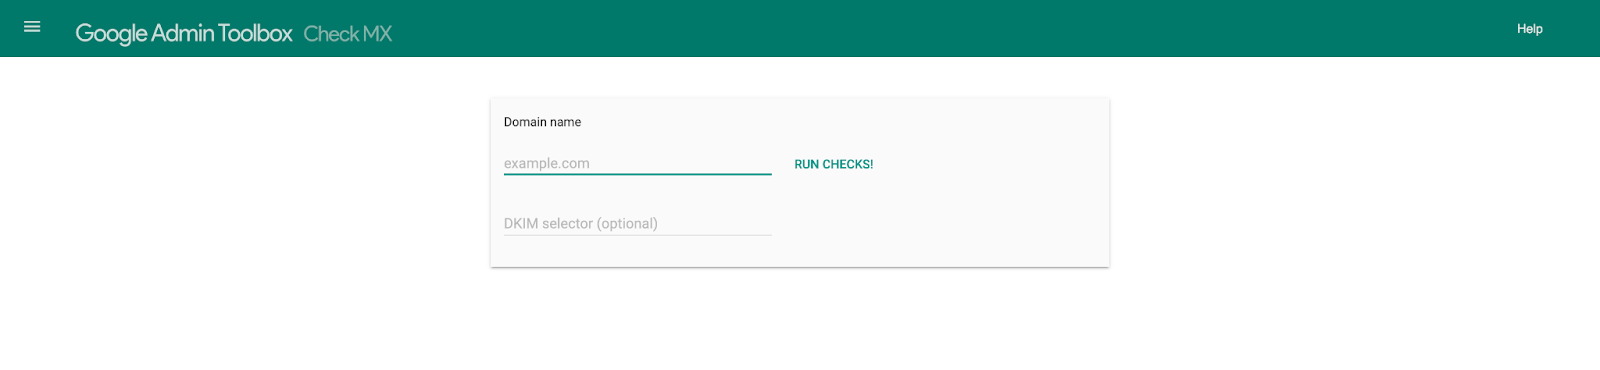
The fastest free way to reliably check DKIM / SPF / DMARC for a domain being used in Google Workspace is the MX Checker by Google Apps:
Once all the authentication protocols are added and working correctly - you’ll see the test result which is delivered show no red or yellow issue alerts, and the report will state ‘No problems were found with the configuration of this domain’ like so:
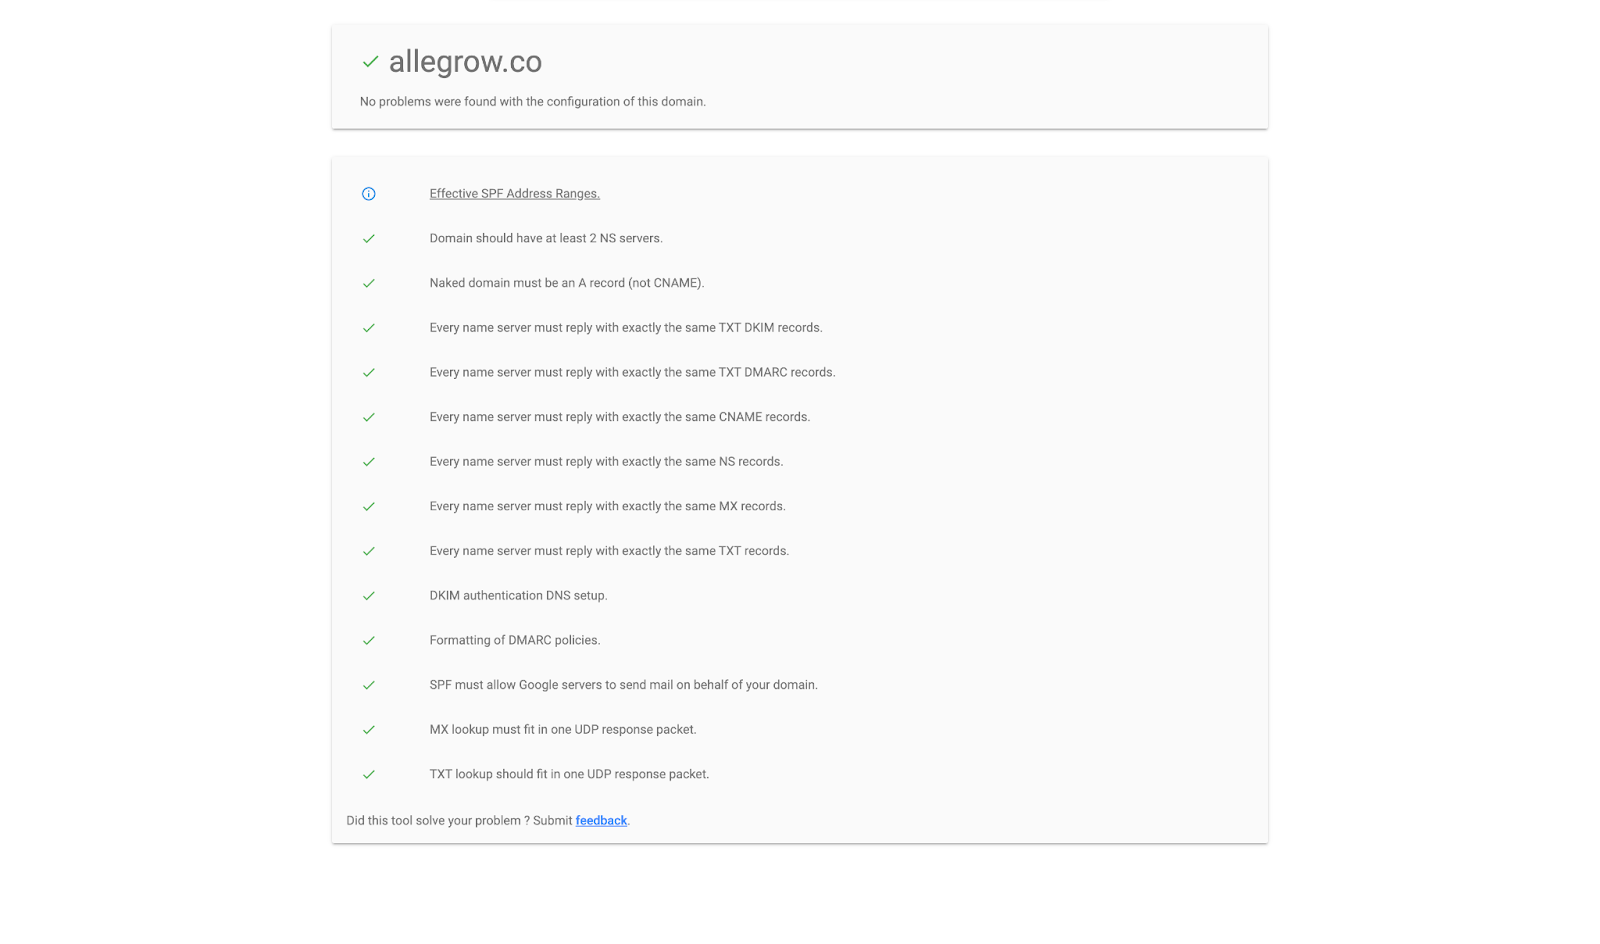
However, if any of these settings are misconfigured this will be highlighted in the report, and you will be linked to the relevant google help guide for the correct configuration of the aspect of your email set-up which is currently incorrect. (Documentation will be available by clicking the ‘i’ symbol next to the error in question). It’s strongly advised that your domain has no outstanding configuration issues before and during sending outbound emails, as it’s highly likely your messages will be sent to spam if your emails aren’t authenticated.
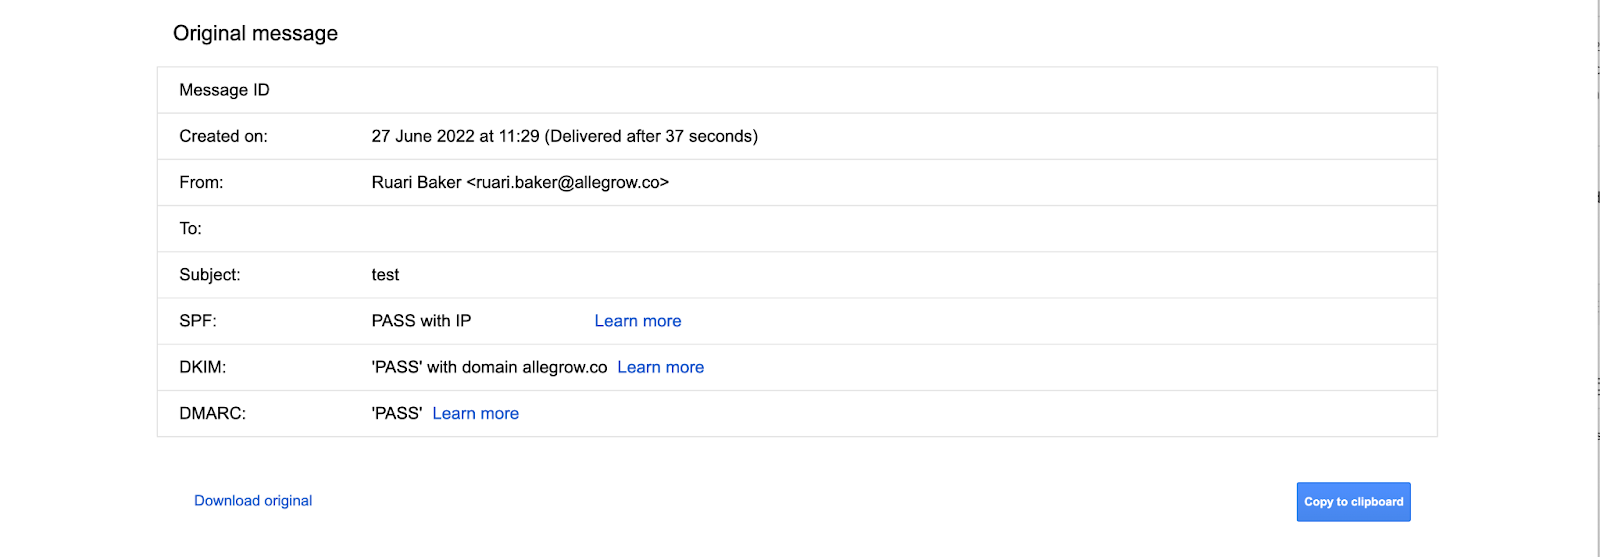
On the other hand, if you’d prefer to manually review an email to see if authentication is working - you can manually send a test email to a different G Suite account that you have access to (outside your current domain). Then select ‘Show original’ on the options while reviewing the email:

Then, while reviewing the original message you should see PASS listed on SPF, DKIM and DMARC headers:
Why SPF and DKIM are important
Sender Policy Framework (SPF) and DomainKeys Identified Mail (DKIM) are both standards of email authentication to prevent spammers from being able to send spoofing and phishing messages through your domain. This protects recipients of your emails and your sender reputation.
Here’s Google’s guidance on DomainKeys Identified Mail and Sender Policy Framework
With SPF records, domain owners are publishing which mail servers are specifically authorized to send emails. With this in place, emails received by recipients PASS SPF checks and are viewed as more trustworthy by receiving servers. Therefore, you’re more likely to reach the primary inbox rather than the spam folder actively having this protocol.
DKIM has a similar purpose to help show a receiver that an email is legitimately from the original sender and has not been tampered with during the delivery process. After DKIM is in place, a DKIM signature will be attached automatically to every email sent through your domain. This signature includes everything required for a receiving server to verify the signature and check it has not been modified in transit.
Spammers who burn through their domains or are conducting malicious activities are either unable to set up these protocols or unwilling to take the care and attention required to setting up and maintaining them. Therefore, having both DKIM and SPF working correctly on your email accounts and domains is a clear first step to showing you are a trustworthy sender.
We’d advise in today's climate of inbox overload - they are a must-have for email campaigns to reach the primary inbox of your recipients.
What is DMARC
DMARC, which stands for Domain-based Message Authentication, Reporting & Conformance, is a protocol which combines the signals from SPF and DKIM to prevent phishing attacks (due to impersonation) by enabling ISPs to act on the results of email authentication.
As well as combining the results of SPF and DKIM, this protocol creates a policy allowing receiving email servers to have instructions on how to handle emails which fail authentication. Therefore, DMARC provides guidance for the receiving email server on whether emails which fail authentication should be rejected or quarantined based on your policy.
Reports on how unauthenticated emails were handled by receiving servers will also be reported back to you as an email admin once DMARC is fully functional. This transparent structure of reporting and sharing data on unauthenticated emails is a hallmark of trusted senders who are trying to eliminate spam from the world's email ecosystem - which is why having this in place can be associated with higher quality senders and better inbox placement as a result.
Setting up an SPF record (Sender Policy Framework)
Always double-check there is not an existing SPF record on your domain's DNS settings - as having more than one SPF record on a domain/subdomain will cause authentication to fail and hurt deliverability. You can conduct this first step by carrying out a check of your domain and asking your IT contact to search for a TXT record on your DNS settings which is an SPF.
Once you’re certain there is not already an SPF record on your DNS - it’s important to note Google Workspace guidance for basic SPF set-up is available here, while their more advanced guidance is listed on this link. In order to complete the set-up of an SPF you will need access to the following details:
- Access to the admin panel of your domain hosting provider. (e.g. Namecheap, GoDaddy, Ionos, Google Domains etc).
- Identification of all services/senders which are sending email on your behalf. This doesn’t mean email addresses/users; instead, we’re referring to any servers, applications or website plug-ins which send emails automatically on your domain. If you’re unsure whether a service is sending emails through your domain - simply contact their support and ask them ‘Are the emails we send via {insertCompany/ServiceName} sending through our domain {insertYourEmailDomain}? If so, can you please advise how your IP or Domain should be listed on our SPF record so messages are authenticated?’.
- An understanding of what IP addresses are being used to send emails on your domain (if any custom IPs or servers are in use at all). The Google Workspace explanation of IP addresses and IP address blocks can be found here to add more background.
- Have an understanding of how DNS TXT records work and can be added, deleted or edited. GSuite users can find full guidance on TXT records here.
- Double-check if an SPF record already shows on the checking guidance we have provided - if one is fully functioning you should be able to see the following SPF results on the check which gets run:
_spf.google.com
_netblocks.google.com followed by several IP addresses
_netblocks2.google.com followed by several IP addresses
_netblocks3.google.com followed by several IP addresses
Once you’ve established all of the above points you can begin creating your SPF record. To understand how an SPF record is structured it’s important to note: SPF records can contain mechanisms, values and optional qualifiers which you can add to any mechanism. Mechanisms direct the receiving server on how to check records on the DNS and use specific protocols when checking authentication. However, values are IP addresses or domains of the allowed senders on your domain. The typical use case for a google workspace user for an SPF qualifier will be deciding between ‘~all’ or ‘-all’, we’d generally advise using ‘~all’ as there is less risk of your emails landing in spam with this option.
If you only send emails through Google Workspace (no third party sending services or servers etc on your domain), then setting up your SPF record is as easy as copy and pasting the below into your DNS settings as a TXT record with the value :
v=spf1 include:_spf.google.com ~all
List the Host in your DNS record for the above as ‘@’ OR if this record is for a subdomain, enter the subdomain name as the host. *Beware - some hosting providers require you to list the fully qualified (entire domain), rather than only the subdomain as the hostname for authentication to work. For example, some providers will require ‘subdomain.domain.’ to be listed as the host, whereas others will require ‘subdomain.’ Therefore, when you’re implementing authentication, check with your domain host how they require a subdomain to be listed on the host in a TXT record.
The TTL should be 1 hour or 3600 seconds for this record.
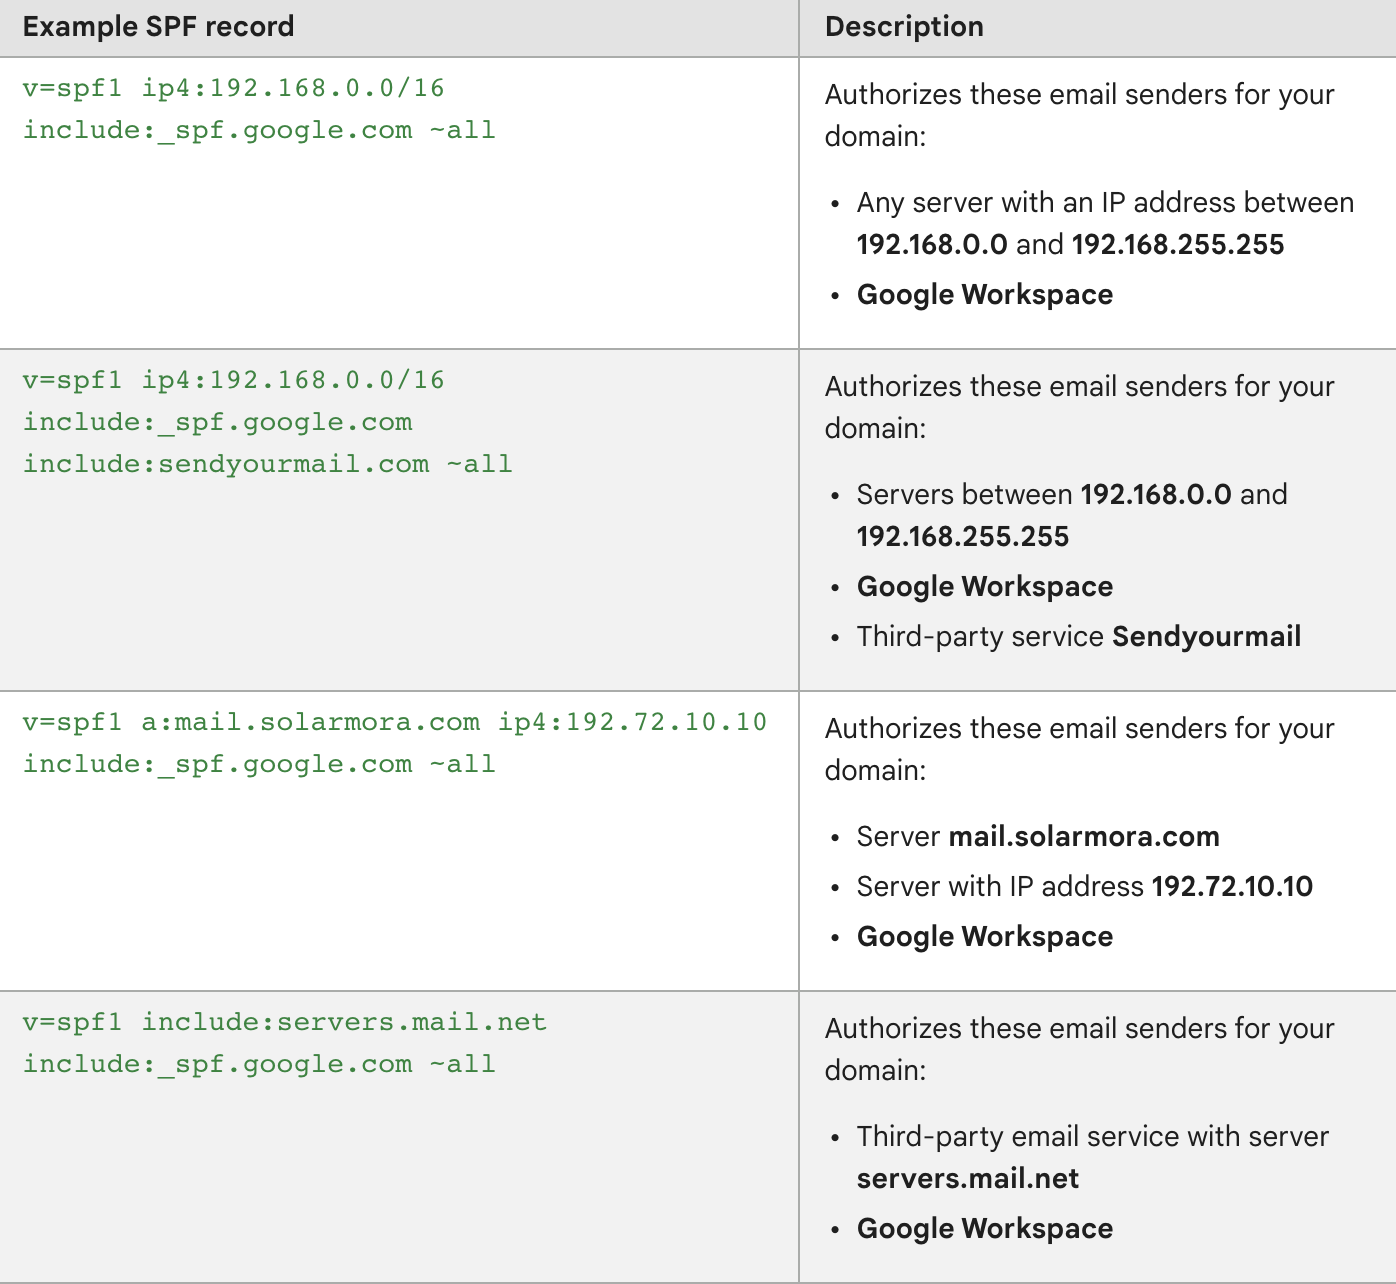
On the other hand, if you are sending emails via multiple services and servers as well as G Suite, you will start with the same structure while you’re creating the record
‘v=spf1 include:_spf.google.com ~all’, but proceed to add the information on each other sender to the record with the correct mechanism being used, as the following examples from Google Workspace below show:
After you have created the SPF record which lists out all senders of your domain, you can proceed to add this to your DNS settings using the same guidance for Host name and TTL as we mentioned previously.
Keep in mind that as you create an SPF record there cannot be more than 10 references to domains and servers, which are known as look-ups and the record should not have more than 255 characters or 512 bytes in file size. If you do have more than 10 email services being used across your organization, you should spread their usage across different subdomains so they can all be supported through a domain which has SPF enabled (as each subdomain will have a different SPF record).
In order for this set-up to remain correct and avoid unauthenticated emails being sent, you will need to edit the record each time a new email delivery service or server begins getting used through your domain so that this new domain or IP is listed on the active record.
Finally, after you’ve added your SPF record to the DNS, it can take up to 48hrs for the authentication to start working. Therefore, you may want to test the functionality after this update period has passed.
What you need to include in your SPF records
Sender Policy Framework (SPF) records need to include any server (IP) or service (domain) which sends emails on your behalf in order for those emails to be authenticated.
This is a little more nuanced than you might think initially, as some applications will be simply asking for emails to be sent through your existing email client (GSuite), whereas others will actually send the emails through their own servers. It’s important to note: even though some services will not need to be listed on the SPF record, they will still need SPF to be set-up and active in general in order for their platform to be effective.
The most common servers which would need to be added to the SPF record you create are either on-premise servers that you use to send emails, or a dedicated IP you are using through a service like SendGrid. Examples of the most popular services you would be likely want to list as domains would be the following:
- Hubspot Marketing / CMS (‘Hubspot Sales’ editions will work differently for professional and enterprise users).
- Pardot - (usually as) - ‘include:aspmx.pardot.com ~all’
- Mailchimp - (usually as) - ‘include:spf.mandrillapp.com’
- Marketo (usually as) - ‘include:mktomail.com’.
- Constant Contact - (usually as) - ‘include:spf.constantcontact.com’
On the other hand, the application you use for outbound emails/sales sequences is more likely to rely on sending messages through your existing GSuite (or O365) accounts. In which case, you simply need to ensure you have gone through the implementation of SPF, DKIM and DMARC correctly for your overall inbox provider in order for these applications to send emails that are authenticated. It’s also worth noting that it may be required with some applications to set up a custom tracking domain for open, click and reply tracking in these applications to work correctly. Examples of some of the most popular platforms which you typically (there are exceptions + updates so always check yourself) send through your existing emails system would be the following:
- Close CRM (all versions).
- SalesLoft - (all versions).
- Hubspot SalesHub - (professional and enterprise versions)
- Outreach - (instances which include Sendgrid could differ depending on your set-up)
- Apollo - (sequence automation).
If you’re interested to find out why we advise cold email sequences specifically should be sent through your own email system rather than a 3rd party SMTP, feel free to check out our best practice guide on warmup and avoiding the spam folder.
How to set up a DKIM record (DomainKeys Identified Mail)
To create a DKIM record you will need access to the admin panel of your domain provider to manage DNS settings, and the admin panel / Admin Console of your Google Workspace account.
Once you have access to those log-ins there are 3 steps to have DKIM fully set up:
1) Generating a record in Google Workspace:
- From the Admin console home section, navigate to ‘Apps’ listed on the left-hand sidebar, then select ‘Google Workspace’, then select ‘Gmail’ from the dropdown list. (Apps > Google Workspace > Gmail).
- On the list of options which appear in the center of the page select ‘Authenticate email’.
- Then click the ‘Selected domain’ option and choose the domain you use to send emails.
- After selecting the relevant domain click the ‘GENERATE NEW RECORD’ button, and copy the TXT record value for the next step.
2) Adding the record to your DNS:
- Log into your domain provider's admin panel and locate the ‘Advanced DNS’ settings.
- Select the option to create a TXT record.
- Fill in the Host Name / TXT record name as ‘google._domainkey’.
- Then copy the entirety of what was generated under the ‘TXT record value:’ on the Admin Console in step 1, and paste this into the ‘Value’ of the TXT record.
- Make sure to save this record on your DNS.
3) Turning DKIM signing on:
- Return to the Google Admin console and follow the same path as you did before in step 1: (Apps > Google Workspace > Gmail)
- Select Authenticate Email and pick the option from the domain list of the domain you previously added a TXT record to..
-Click the ‘START AUTHENTICATION’’ button. Then, once DKIM is fully functional on the domain you will see the status at the top of the page update to: Authenticating email. (this may take up to 48hrs to fully complete)
Now that you've completed all those steps, you can either run a DKIM check or examine an email manually that you have sent to a different email account and look for either DKIM=pass or DKIM=OK, being shown when you examine the original.
Setting up a DMARC record (Domain Message Authentication Reporting & Conformance)
In order to set up DMARC successfully, both SPF and DKIM will need to already be functional. Therefore, make sure you have reviewed our guidance on implementing SPF and DKIM before progressing.
Before setting up DMARC you’ll also need to establish the following:
- That you have access to your Domain Admin to manage DNS records.
- What email address you will be able to nominate in your organization where DMARC reports will get sent to.
- Who on your team will be able to analyze and be responsible for reviewing reports as they arrive.
- Check if DMARC records are already on your DNS using the MX check tool here.
Following on from those foundational checks you can set-up your DMARC as a Google Workspace user with the following steps:
1) Define your DMARC policy (as shown), so there is a clear protocol for how strictly your messages should be checked and the actions which should be taken by a receiving server when authentication is failed.
2) Add your DMARC record to the DNS or update your existing one. This includes creating your DMARC record format with ‘v’ and ‘p’ tags being listed first and the other available tags (pct, rua, ruf, sp, adkim, aspf) being listed in any order of your choosing. Each of these tags must have a description or value. Note that, although we have mentioned ‘ruf’ as a possible tag, this is not supported for Gmail / Google Workspace users and should nor be included.
3) After DMARC has gone live you will want to roll out and update the policy following best practices from Google workspace. This recommendation on a rollout strategy involves starting with a DMARC policy which is not actively being enforced on all messages, then after reviewing reports and being confident most email traffic is authenticated, choosing to quarantine a small percentage of messages and eventually finalizing the policy whereby 100% of unauthenticated messages are rejected.
If you have plans to implement BIMI, the ‘p’ tag in your policy must be set to ‘reject’ or ‘quarantine’. While for BIMI you must implement the ‘pct’ tag on your DMARC policy with the value set to 100. With this in mind, we’d advise only looking to implement BIMI after you have successfully reached the end of the recommended best practice for DMARC rollout - Otherwise, you are likely to either not have the supported values for BIMI or start off the implementation with a DMARC policy which is too strict to be practical for a safe rollout.
Summary check-list and mistakes to avoid
As a final checklist to avoid mistakes in your email strategy - review each of the following points to help make sure you have an optimal set-up for inbox placement:
- If you aim to reach a high sender reputation and avoid spam folders or accounts being suspended, having DKIM, SPF and DMARC set up is a foundational step.
- Make sure to regularly check your Google Workspace domains and subdomains for errors. (payment errors at domain renewal can throw off the set-up).
- Set up SPF, DKIM and DMARC separately following the guidance provided.
- Remember you will need to have each service and IP which sends emails on your behalf reflected on your SPF record.
- Every different subdomain and domain which you use to send emails will need to be checked and have DKIM, SPF and DMARC implemented.
Remember, after you have all these protocols set up, your emails can (and probably will) still land in spam folders a portion of the time. Working to ensure you have high deliverability and inbox placement requires consistent analysis and engagement.